You can bet your bottom dollar that the likes of Turner and Kandinsky refined their watercolour skills over decades, diligently painting day after day as they mastered the art of pigment on paper, water and brush.
Not us, oh no. This is, after all, the home of slapdash crafting where most projects take less than an hour and benefit from the accompaniment of a glass of wine. And I’ve discovered, somewhat by accident, that using basic stencils can create impressively accomplished results with very little skill. It’s a great thing to try when you have a few minutes to spare, and the results are likely to be as good if you’re 8 as if you’re 80 (and there’s not much we can say that about).
 Watercolour Palette
A few basic materials are all you’ll need; simple stencils, watercolour paints and something to mix them in (I used an inexpensive plastic palette), heavyweight paper and brushes. The choice of paper is the most important thing; using 300gsm paper will help the paint flood within the stencil but then be quickly absorbed, reducing the risk of it running.
DIY Materials
Once you’ve chosen your stencil and assembled your paints and paper, simply hold it in place lightly with your fingers and brush your chosen colours into the stencil. Work quickly, so that the colours can mix before they dry. Warm colours work beautifully together (pinks, oranges, reds and golden yellows), as do cool ones (blues, greens, lemon yellow), but there are no rules.
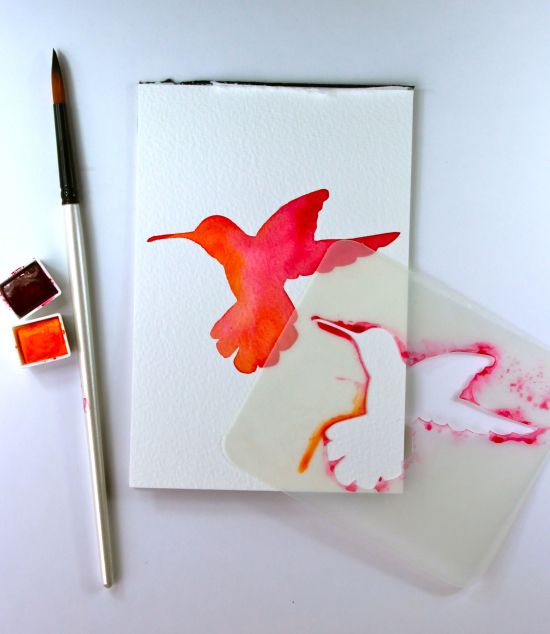 Bird In Pinks
If you have a steady hand, you can whip your stencil off straight away; otherwise, wait for the paint to dry completely. I’ve found the best technique varies from one stencil to the next (I guess it’s to do with the shape); for my hummingbird I was able to lift the stencil off instantly and the still-wet paint retained a perfect silhouette. For the pigeon at the bottom of this post, it took 20 minutes patient waiting and a cup of coffee before it could be successfully revealed.
Once I’d done a few stencils, I began experimenting with rubber stamping, into both wet and dry paint. Make sure you do this with the stencil in place to get a clean finish within your chosen shape.


I used these bird stencils, but letter / monogram stencils would also look wonderful . If you don’t have any stencils to hand but do have craft punches, simply punch out a shape in a sheet of thin plastic or cardboard, and use it as a stencil. Use the finished paintings for cards, gift-tags or collage, or even frame them as paintings in their own right.
So; a morning’s artistic activity where you should be able to refine and develop your prowess in the space of an hour. Much better than a lifetime spent starving away in some bohemian artist’s garret and waiting for the muse to strike…
http://katescreativespace.com/2013/05/14/how-to-impress-with-your-watercolour-skills-even-if-you-have-none/